Author: ChrisN

Social Distance Learning Day 13 – Easter Vacation

Good job to those of you who kept up with us for the entire online course. Even though it may have been challenging and you may not see the progress, creating this or any space for interaction, structure and mental stimulation was a good move.
Below is a print out for a bunny mask that your kids can make. If they make them we would love to see pictures =D.


Also I would encourage you all to paint some Easter eggs. There is something to be gained from giving them the fragile empty eggs instead of plastic or boiled or boiled plastic eggs.

To empty an egg

Apparatus:

  1. Skewer/nail
  2. Eggs
  3. Bowl

Procedure:

  1. Wash your eggs.
  2. Hold one egg over the bowl
  3. Carefully make a small hole with the nail or skewer at the apex or top of the egg.
  4. Turn the egg over and make another small hole.
  5. Work the edges of the hole to make it larger.
  6. Place your mouth at the small hole at the apex and blow.
  7. Make sure the egg falls into the bowl; waste not, want not. 

You can decorate your eggs with poster paints, dye or food colouring. Be creative. You can show this or other videos to your kids first to get them excited.

Pics of these would also be awesome!

Some additional colouring activities:
Enjoy your stay-at-home-cation!

Social Distance Learning Day 12- Rain

So far we’ve done an experiment to show that water evaporates if left outside (especially in the sun) and we’ve trapped that water and shown it condense into water droplets. When these water droplets form in the sky, they become clouds!
Today we mentioned that when clouds have too much water to hold up, the water falls. This is rain.

Today’s science experiment, we’re going to try to make rain in a bowl.

Precipitation

Question: Will the water fall?

Apparatus:

  1. 1 wide bowl (see through if possible)
  2. Cling wrap
  3. Hot water

Procedure:

  1. Pour 1 cup of hot water into bowl.
  2. Seal the bowl with cling wrap.
  3. Observe water condense on the cling wrap.
  4. Look out for the droplets becoming heavy and falling.
  5. After one or two droplets have fallen, they may lightly tap the cling wrap and watch the water fall like rain.

If the water isn’t hot enough, it is possible that the drops will not fall.

Show the above picture to your children and chat with them about it.

Be sure to ask questions like, “Where is the water coming from/going”

“What is the water doing?”  (Evaporating, condensing, raining)

“Is this like your experiment? Which one?”

“What do you think a cloud feels like?”

Etcetera


Social Distance Learning Day 11- Water in the sky – Condensation

Yesterdays experiment allowed the children to observe the effects of evaporation. So we all know that the water disappears when it is left outside but where does it go?
Today we spoke about condensation and the formation of clouds.

Print out or draw a cloud for your children to colour BUT

They must use a blue colour pencil and utilize stippling.
Stippling is the technique of making a whole lot of dots that come together to form a picture.

Tell your kids that each dot they make is a water droplet. You can help them make dots too.
The intention is that they get the idea that a cloud is made up  a “whole lotta water droplets“.


To further understand the concept of evaporation, please conduct the following experiment.

Condensation

What we know from the last experiment: Some of the water in the cup leaves the cup if you leave the cup outside.

Question: Where does the water go?

Apparatus:

  1. Two matching, dry and transparent cups
  2. Measuring cup
  3. Tape
  4. Water

Procedure:

  1. Measure 1/2 cup of water
  2. Pour 1/2 cup of water into one of your transparent cups.
  3. Make sure your second transparent cup is dry.
  4. Place the second cup inverted on top of the first. (As seen in photo below)
  5. Use your tape to seal the cups together.
  6. Place the cups outside in the sun and leave them.
  7. Return to check on your cups at 5:30PM
  8. Take a picture of the cups.
  9. Observe what has happened to the water and discuss.

Discussion

  1. The water rose up from the lower cup to the upper cup
  2. The water condensed, forming water droplets on the upper cups
  3. With out the upper cup, the water would have gone up into the sky!
  4. When water condenses in the sky, they turn into clouds.

We didn’t use two transparent cups. If you don’t have two transparent cups, make sure that at least the upper cup is transparent.

Social Distance Learning Day 10- Why is it so dry? (Evaporation)

Today we spoke about the dry season.
We pointed out that Trinidad and Tobago has two: Dry season and Rainy Season.


Today our focus was evaporation. Show this picture to your children, talk to them about it and ask them to draw it for you. Make sure they can identify that the thing on the ground is a glass with water in it.  Pay attention to how they hold their crayon/pencil.

To further your children’s concept of evaporation try the following experiment.

NB: It is important that your children do this experiment as it is part of the larger topic, “The Water Cycle

Evaporation

Question: Will the water stay in the cup?

Apparatus

  1. Five (or more) see-through cups/glasses
  2. A marker or masking tape
  3. Water

Procedure

  1. Fill a small amount (2 table spoons or so) of water into each cup.
  2. Mark the level of the water with your tape or marker. (Do this on a flat surface.)
  3. Place one cup in the fridge.
  4. Place another cup somewhere inside. (Away from a window or fan/air conditioning)
  5. Place thee cups outside making sure at least one stays in the sun.
  6. Leave the cups there for the day.
  7. Return to check on the cups at 1:00pm, 3:00pm and 5:00pm
  8. Observe the level of the water.

Discuss the results.


Talk to your kids about Social Distancing.

Why are we stuck inside?
Most kids can already respond “Caronavirus!” (If not you need to tell your children about it)
Today we spoke about what the Caronavirus can do if it gets into your body. ( You could get sick and die.- Israel et. al. 2020)
We spoke about how people can share the Caronavirus.

If they cough on their hands, they put food and spit and GERMS in their hands. When they touch things (We used the guitar), the germs go onto that thing. When someone else touches that thing (The guitar) the germs climb onto their hands!

OH NO! THIS PERSON GAVE GERMS TO THAT PERSON!!!!!!

It’s even worse if someone coughs and they don’t cover their mouth because the germs can travel through the air to all sorts of places, including you!

We spoke about how the germs enter your body through your eyes, nose, mouth and ear

and concluded that this is why we are staying inside.

“We are staying inside so we do not give germs to people and we do not get germs from people.”

Finally we revisited the fact that washing your hands with soap can kill the caronavirus on your hands.


Please parents go over this conversation with your kids a couple times from different angles, especially if you missed today’s class.

Here is the craft for today:

This picture is just a guide, be creative. Use play-dough, slime, flour dough or paper to make a model of a virus.

Below is more detailed but simple image (That I drew just for you guys <3) of a virus for your information, parents. Feel free to share it with your kids though.

The spikey bits poking out are proteins. These are like a virus’ finger prints. It is how our body figures out which virus is which.


The lipid coating protects the virus like our skin protects us.

Soap destroys this coating.(More effectively than hand sanitizer)

With that membrane destroyed, the virus has nothing protecting it and it dies.


The RNA is a set of instructions that allow the virus to replicate or ‘copy’ itself. (Using our bodies! 0.0)


Once you think your children understand the concept of staying inside so as to not share germs, tell them that we call this “Social Distancing”.
You should now feel free to use this term with them in conversation. Don’t feel bad about having to remind them what it means.

Thanks! See you guys tomorrow unless you’re a Zenith Preschool student, then i’ll see you at 2pm.


Social Distance Learning Day 8 – Ocean Animals + Is it Sweet Science?

In recent classes we spoke about fishes, starfish, turtles (and tortoises), Octopuses and Rays.

Please chat with your kids about these animals and about the ocean. Talk about their diets, their defense strategies, their unique behaviour or characteristics, their relationships and your opinions about these things.

If you don’t have much knowledge or opinions about these things, this is a good time to learn. Look over the conversation aids in the last few lessons and discuss.
Feel free to ask hard questions like, “Is the turtle bad for eating the octopus?”


*******
Try this science experiment over the weekend.


Science Exercise: Taste – Sweet
Materials, equipment
Small samples of sweet items:
A few sugar crystals (about 10)
A small dab of condensed milk (just wet the spoon with it)
One piece of a sweet cereal (like frosty flakes)
A tiny piece of jam
Smear some mustard on a spoon
Method
(Always use very small amounts of the samples – just enough to taste)
Do the same for each of: sugar, condensed milk, sweet cereal
Give your child enough to taste
Tell your child, ”This tastes sweet”
Wait about 5 seconds then go to the next sample: do the same.
After this is done;
Tell your child, “I will give you two things to taste. One of them is sweet. Can you
tell me which one is sweet?”
Then give your child one at a time. the sample of mustard and after 5 seconds the
sample of jam.
Ask the child which was sweet.

Comments
You may use any sample other than those named that is clearly sweet (eg honey, cake decoration,
etc)
Let your children answer for themselves without guidance or clues/


Looking forward to our parent’s meeting later.

Social Distance Learning Day 7-Octopuses

Today’s talk was about Octopuses (Correct plural; Octopi is not technically incorrect though…)

At the bottom you’ll find our science project for the week. It is important for you all to make these as they shall be used in other experiments in the near future. Thanks =)


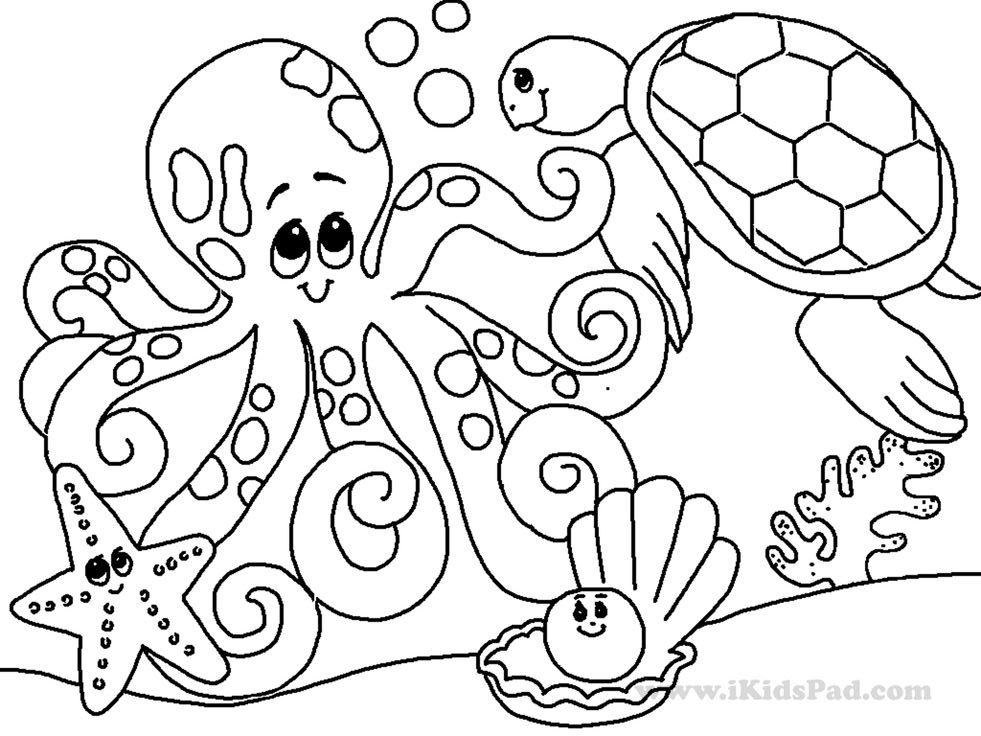
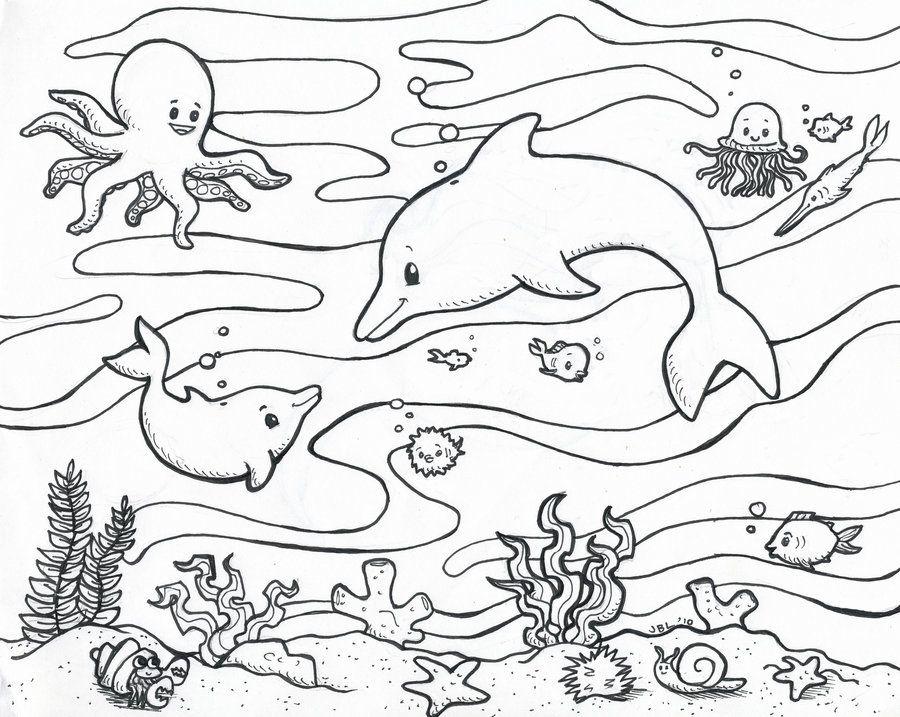
Even if you do not print and colour the picture, look at it with your children and discuss.

Here are some things to talk about with this picture:


“What animals are in the picture?”  (Turtle, Oyster, Octopus, Starfish)


How do you know that is a turtle and not a tortoise?”     (Flat shell, Webbed feet like wings instead of short feet. It is in the water; tortoises stay on the land)


“Do you think any of those animals would eat each other?”   (The turtle might eat the octopus. The Octopus might eat the oyster)


“Oh no! Do you think the octopus can escape if the turtle wants to eat him?”


“How can he escape? What would he do?”    (He can squirt ink and dart away and maybe he can change colour to camouflage on a rock or in the sand)


“What other animals do you know about that use camouflage?”   (Good examples include: Butterflies, Chameleons and army people.)


“How many arms and legs does an Octopus have?”   (Two legs and six arms)


“Do you think an octopus is soft and smooth or hard and rough?”


“Can an octopus fit inside your water bottle?”    (Yes.)


Remember these are not quiz questions. The children do not need to have known the answer nor do you need to teach them the answer. The objective is to have a conversation and inspire some curiosity. For the benefit of memory however, it would be a good idea to ask the questions a day later or bring it up in conversation randomly at times. This will very much exercise their skills of retrieving information, even if they don’t remember.


Additional:
It’s hard to appreciate how octopuses change colour with a photo so here is a video you can watch with your kids. (Click the word ‘video’ to go to the video)

If you have extra time, look for more pictures of octopuses with them on the computer or phone or tablet or thing-with-screen-and-internet.


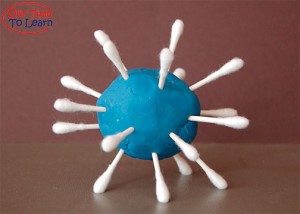
Today’s project is the making of a pendulum. At Zenith, the kids could play with our pendulum for ages. It’s a good occupational toy and can be adapted into a one player game of catch.

Make a pendulum


A pendulum is simply a weight (called the bob) at the free end of a string or rod so it can swing from a pivot (where it is attached).

In the past pendulums were used in clocks to accurately measure time and has been exhaustively studied by scientists. Today we use electric, electronic or atomic tools to measure time.

For us a pendulum is a lot of fun!

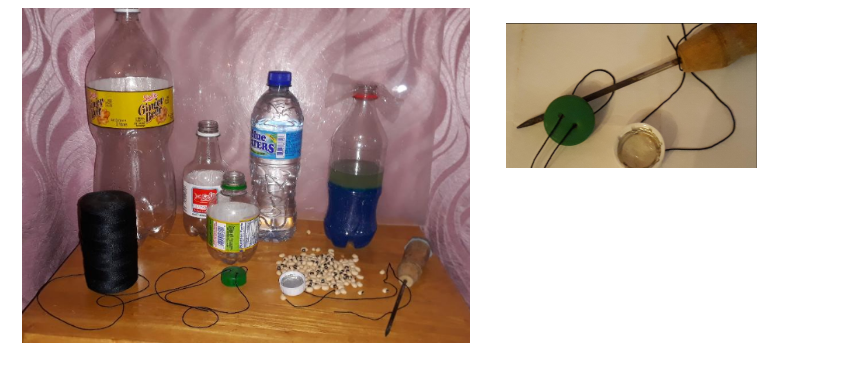
Here is a simple way to make a pendulum that children can enjoy.


What you need:

  • A bottle cap (eg Coke or Chubby or Solo or water bottle)
  • A bottle that fits the cap (I recommend a few different ones for variety)
  • A skewer or ice pick
  • Some strong light string (light nylon can do, long enough to get the pendulum at child height)
  • A beam or bar or hook where you can hang the pendulum
  • A stove or lighter
  • A small piece of foil or plastic
  • Water or gravel or rice or sand (to weigh the bottle)


What to do:

  1. Heat the skewer or tip if the ice pick on a stove or with a candle or lighter
  2. Use the hot Skewer of ice pick to punch two holes in the bottle cap (through which string will be looped)
  3. Tie one end of string through these holes so that the string is knotted on top the bottle cap
  4. Fold the aluminium foil (or plastic) a few times and trim it to fit inside the bottle cap (this will be used to prevent water leaking out when the bottle is attached). You may trim after you have attached the bottle.
  5. Attach the other end of the string to the beam or hook or bar or tree trunk. This is where the pendulum will hang
  6. Attach any bottle of choice to the bottle cap after putting some water or gravel or rice into the bottle to give it some weight


Comments

Safety:

Teach your child that the bottle swings back and they should be prepared to catch it or block it or move out of the way, Or they should stand back when they propel it forward


Let children play with if it as they fell inclined. You can change the bottle, add coloured water, change the length of the string.

You may put up two different ones at the same time.

Later we may use these for science experiments.


Social Distance Learning Day 6- Cats

Mya found a cat in a drain so we’ll be talking about cats today. Here is the relevant craft.

The Template for this can be found here.

Here are some conversation tips for this craft.

“Where are its claws?”    (They’re inside his toes)


“What are those, is that a mustache?”  (No those are whiskers)


“Why does he have whiskers?”   (They help him to know when there are predators around. He can even use them when he can’t see.)


“Tell me what would happen if a cat fell off the table.”     (Something to the effect of it landing on his feet)


“What sounds do cats make?”    (Meaw, Purr, Hiss, Growl)


“What do cats eat?”   (They are carnivorous, they eat meat.)


Today’s assignment is to sing a song with only cat sounds.
eg.

“Meaw meaw meaw meaw meawww meawww meawww.” – Merry had a little lamb.

Social Distance Learning Day 5

Today we’re going to talk about turtles and tortoises. Here is a tortoise for the children to colour.

Here are some conversation helpers about turtles and tortoises.

Is this a turtle or a tortoise?  (Tortoise)

How can you tell if it is a turtle or a tortoise?       (Turtles have webbed feet, like wings; Tortoises have short feet.  Turtles have flat shells and tortoises have round ones. Tortoises live their whole life on the land; Turtles live most or part of their life in the water.)


Why do turtles/tortoises have shells?  (For protection, Shells are hard so most animals can’t bite it or break it)


What do turtles eat?  (Fish, squid, seaweed. They are Omnivorous)


What do Tortoises eat  (Leaves, flowers, fruit. Almost all Tortoises are herbivorous)


If you had a pet turtle/tortoise what do you think it’s name would be?


Where are baby turtles born?  (They hatch from their eggs which are buried on a beach.)


Do turtles spend a lot of time with their mommies and daddies?  (No)


Do tortoises spend a lot of time with their parents?  (Yes)


(For your information: Turtles vs Tortoises )


Today’s activity is to pretend to be a tortoise. You can use your backpack as a shell or you and your parents may make something more elaborate. Take a picture of yourself as a tortoise and show me tomorrow.


Social Distancing Learning Day 4

Today we read the story, “The Yellow Car”. Here is our relevant craft activity.
Here are some conversation ideas to use during or after the craft activity.

“Why do cars have wheels?”


“Can a real car every feel sad?”


“What do you like about cars?”


“What sounds do a car make?”


“Cars come in many different colours. Why is that?”


“Can a car take a shower? How do we keep our cars clean?”

(Here’s a good chance to get them to wash your car for you. =p)


“Is a plane a car?”


“Is a truck a car?”


I didn’t fill in answers for these because I didn’t think you would need them so much.


Today’s activity.
1.Write these words clearly in large letters on a sheet of paper.

“Car”

“Truck”

“Plane”

“Automobile”

2.Show them the word car.

3.Ask them “Do you know what word this is?” (If yes then *)  (If no then carry on)

4.Tell them, “This is the word, ‘car’.”

5.Read it to them.

6.Have them repeat the word and let them hold the paper.

7.Put the four papers infront of them and tell them to bring the word “Car” to you.

8.You can go through the individual letters for the word and spell it out with them.

9.Let them try to write the word ‘car’

* If this is too easy for your kids, you can pick one of the other words instead. (Some of them know the word ‘car’ fairly well already.)